
Help using BAN TACS Microsoft Office (MS) Excel Workbooks
If you are not a regular user of MS Excel the littlest things can be daunting. Not to worry, help is at hand. For anything that I may have missed here for help using a BAN TACS MS Excel Workbooks use technicalservices@bantacs.com.au to contact me; keep in mind I don’t answer tax questions.
If you want to learn more about how to use MS Excel I recommend doing a Google search on ‘ms excel tutorial’ as there are free tutorials available; you can then start using MS Excel to do all sorts of clever things.
A few general notes before specific concerns are addressed
Limited Rows
The number of rows available for entering your information in BAN TACS Excel spreadsheets has been limited by the need to make the pages printer friendly – the more rows there are, the more difficult it is to see the information when the sheet is printed. Though you can take, or email, your digital copy of your spreadsheet to your accountant.
Scrolling Rows
Many of the yellow cells are sensitive to scrolling. If you are not sure what this means, have a look at the row numbers on the left – below anything in the heading section of the page. Keep an eye on the row numbers as you scroll down with your mouse (or with your mousepad scroller) and you will see that while the heading details remain on the screen, the row numbers under the headings are scrolling through.
Undoing a mistake in an Microsoft Excel Workbook
One very handy feature in most software programs, not just MS Excel, is ‘Undo‘ – commonly known as the feature for ‘oh bugger, I just did something silly how do I go back to where I was before?‘. Different programs have different restrictions on how much undo-ing you can do. With MS Excel you can usually rely on it to undo all the way back to the last time you saved the work you were doing.
In MS Excel you will find ‘Undo’ in the ‘Edit’ menu/tab – ‘Edit’ -> ‘Undo’. You can also Undo using a keyboard shortcut by holding the Control key (Ctrl) when you press the ‘Z’ key (Ctrl+Z). This keyboard shortcut will ‘Undo’ in nearly all programs.
Save often! Always save your Workbook at regular intervals. Here are three easy ways you can save:
- Click the ‘Save’ icon – it looks like a floppy disk
- Use ‘File’ -> ‘Save’ from the main program menu
- Or you can save by holding the Control key (Ctrl) when you press the ‘S’ key (Ctrl+S)
FAQ’s for BAN TACS MS Excel Workbooks
Here are some answers to the questions that are frequently asked when using the BAN TACS MS Excel Workbooks.
What is the difference between a Spreadsheet, Calculator, Worksheet and Workbook?
The biggest problem here is Accountants. Accountants are notorious for interchanging words as if everyone knows what they are talking about. Wikipedia says a spreadsheet is a computer application that simulates a paper accounting worksheet. It displays multiple cells usually in a two-dimensional matrix or grid.
MS Excel is a Spreadsheet program that can perform calculations. A Worksheet is a page in an MS Excel Workbook; when you open MS Excel with blank pages you are opening a new Workbook that typically has three blank Worksheets open by default.
When you purchase one of the MS Excel BAN TACS products, you are getting an MS Excel Workbook containing various Worksheets. Most of the Worksheets contain formula’s that perform calculations and turn your information into user-friendly reports – usually one report that is helpful to you and one that is helpful to your accountant. Because of the calculations, accountants will sometimes call a Workbook a Calculator.
At BAN TACS Accountants Pty Ltd there is a casual naming convention. Typically, if the reports produced are akin to traditional spreadsheets then Julia will call it a Worksheet or Spreadsheet. Otherwise, if the reports are more along the line of displaying mostly the calculated results then Julia will call it a Calculator.
Why is my document ‘Read Only’?
When you purchase a BAN TACS Excel Workbook/Spreadsheet/Calculator from the internet, it arrives on your computer in as a compressed .zip file. Compressed files need to be uncompressed before your computer can remove the ‘Read Only’ status. Many files are compressed for easy movement around the Internet.
The first little problem here is that, since Microsoft released their Vista operating system, the default setting for Windows is to ‘Hide file extensions for known file types’. To me, this is an odd default and assumes everyone is familiar with the document icons. For those of you who are unfamiliar with the terms ‘file type’ and ‘file extension’ here is a brief explanation: The most common file types people are familiar with are MS Word documents, MS Excel documents, image files such as JPG, GIF, PNG, etc. and music files such as MP3, WMV, etc. The file extension is the three or four letters on the end of a file after the full-stop. For example, MS Word documents usually end with a .doc or a .docx and a music file typically ends with .mp3. The file extension tells your computer which program to use when opening it. If you have just received a file you purchased from BAN TACS Shopping then your file will have the file extension .zip because it is a compressed file; another common type of compressed file is .rar.
To change the default setting that allows you to see your file extensions, it is easiest for you to Google ‘Show file extensions [your operating system version]’ for example, if your operating system is Vista, type into Google: show file extensions windows vista. The very first result will be instructions, directly from Microsoft, relevant to your operating system.
The next little hurdle will be if your computer didn’t come with a compression program. The most common ones are WinZip and WinRar and usually one of these will come pre-installed on your computer. If not, you can either purchase one of the programs mentioned or you can download a very good, and free, compression program called jZip – just Google for it. It’s easily installed and easy to use. Once you know you have a compression program installed, right-click on the file you received from us. Check your options, and use ‘Extract here’. Extract means to uncompress, and using the ‘Extract here’ option will place the uncompressed file in the same directory/folder that the .zip file is in. Now you can open your file – the one with the .xls file extension – and start using it.
If this information has not answered your question you may want to read another tip for a ‘read only’ issue that arises: How come I get the warning message “The cell or chart you are trying to change is protected and therefore read-only”?.
How do I copy my file so I can use a fresh copy each year?
Most of the BAN TACS MS Workbooks are for ONE FINANCIAL year only and need to be copied, while blank, for future years. The Loan Apportionment Calculator, on the other hand, is built to have a life of approximately 10 years. To use a workbook every year, make a copy of the original .xls file and rename it with the year you will be keeping the records for.
How can I keep my records for this year and start new records for next year?
You will need to save the BAN TACS MS Excel Workbook somewhere on your computer where you will be able to find it again. This is very important. We recommend that you save the Workbook/file where you keep your other financial records. Or at least place it in a new aptly named directory/folder inside your Documents/My Documents directory.
The following is two of the options available to you for saving multiple copies of one file. The second option is one that works consistantly no matter what file you are copying. However, the first one tends to be easier and can be used for many common file types; eg Word, PowerPoint, Excel, and others.
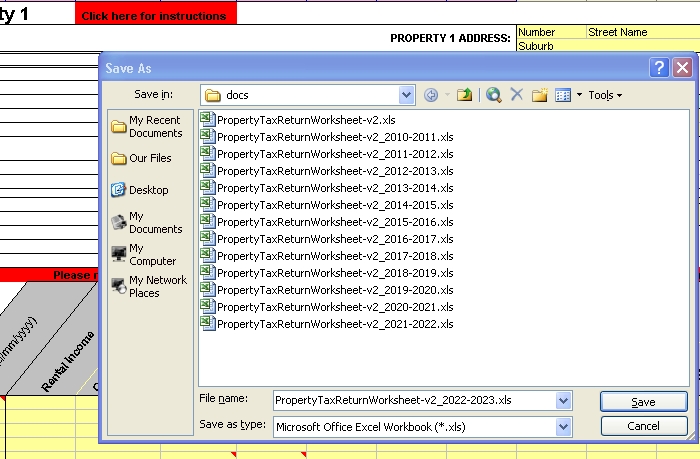
For these examples I will be using the PropertyTaxReturnWorksheet-v2.xls file.
Copy your file from within the program that opens it:
- Open PropertyTaxReturnWorksheet-v2.xls in Excel
- From the ‘File’ menu select ‘Save As’
– In newer MS Office Suites the round Microsoft icon in the top-left corner is the File menu so you click on that instead of the word ‘File’ like Office XP and older Office Suites have
– The keyboard shortcut for this is: Alt + F + A. That is, while holding the ‘Alt’ key press the ‘F’ key then press the ‘A’ key - In ‘File Name:’ change the name of the file by adding the finacial year to the end of ‘PropertyTaxReturnWorksheet-v2’ – see the picture below
- Make sure the ‘Save as type:’ is .xls (Microsoft Office Excel Workbook (*.xls))
- Select -> ‘Save’
- Repeat steps 2 to 5 for as many years as you think you will need it
Or you can copy your file from within the directory/folder:
- Copy your file
- Go to the folder/directory you have saved the file to
- Right click on the file, PropertyTaxReturnWorksheet-v2.xls, and select ‘copy’
- If you have XP or earlier, right click on some white space inside the folder/directory and select ‘paste’. If you have a later Operating System, you will be given some copying options – just make sure you don’t select the option to replace the original document/file
- Rename your file relevant to the financial year you are using it for
- Once you have copied your .xls document, it will be named either ‘Copy of PropertyTaxReturnWorksheet-v2.xls‘ or ‘PropertyTaxReturnWorksheet-v2 – Copy‘.
- Right-click on the file and select ‘Rename’ then type in: PropertyTaxReturnWorksheet-v2_2010-2011.xls.
- If you use XP or earier, make sure you remember to put the file extension .xls in the file name; newer software will keep the file extension for you.
By adding the financial year (eg _2010-2011) to the file name you will know exactly what the file is for and exactly what financial year the records are for. Do this for each financial year.
Where do I enter my information?
In the BAN TACS MS Excel Workbooks we try to keep all the cells you enter information into as the colour yellow. Unfortunately, in the BAS Workbook we had to diverge from this convention just a bit. We have locked the other cells so you don’t accidently delete the formulas that are working in the background.
Each Workbook has as much instruction in it as most people can handdle. To find out what you need to do you can see your Workbooks Instructions page and hovering your mouse over the funny little red triangle that appear in the top-right corner of some cells will provide you with some pop-up information.
Different Workbooks have different requirements from you as far as data entry goes… the idea being to give you something you can do easily enough yourself so you don’t need to pay your bookkeeper or accountant to do it for you.
Worksheet Tabs allow you to navigate to other pages

You can navigate between different Worksheets in you MS Excel Workbook by clicking on the tabs at the bottom (see the next question if you can’t see your tabs). In the Property Tax Return Workbook each property has two worksheets (pages) to enter information into and there are two worksheets (pages) dedicated to reports; so it contains many worksheets. In comparision, the Loan Apportionment Calculator has only three Worksheets: one page to enter the transactions on your loan account, one page for instructions and one report page that tallies up the portion of the loan that is tax deductable.
Why can’t I see the page/worksheet tabs?
MS Excel will not display the bottom of the Workbook unless the Workbook is in Full-screen mode. This gets a bit confusing when Excel lets you put the Excel program into full-screen mode while the Workbook can remain reduced (and vise-versa). All you need to do is Maximise the Workbook and the page navigation will become visible.
The image below shows the maximise buttons you need to use, they can be found in the top right-hand corner.

Yes, you can Maximise the MS Excel program as well. Maximising MS Excel will not hide the Worksheet Tabs, you just need to make sure the Workbook is maximised as well.
How come I get the warning message “The cell or chart you are trying to change is protected and therefore read-only”?
Many of the cells in the Worksheet are protected from being changed. This is so you don’t accidently delete one of the formula’s that are in many of the cells. Trying to type into these cells will give the above ‘read-only’ message and ask you for a password. Enter your information in the cells allocated to information from you, usually yellow, and you won’t get that message any more.
What is the difference between the UserSummary page and the AccountantsSummary page?
The UserSummary and AccountantsSummary will be different only if you do NOT own 100% of the property. The UserSummary page will then show you the property details according to your percentage of property ownership. You Accountant’s software requires the property figures to be entered at 100% of the figures values – their software will handle the percentage of ownership aspect itself.
I purchased the PropertyTaxReturnWorksheet-v2 and the figures on the summary sheets are not showing properly
The figures on the summary sheets are dependant on all the figures in the Property sheets, in particular, you must be sure to enter your percentage of property ownership AND that the whole of ownership must add up to 100%.
I purchased the PropertyTaxReturnWorksheet-v2, what if I have more than four properties?
Make a copy of the BAN TACS Property Tax Return Worksheet file and other properties can then be entered into it; just make sure you rename the document so you can distinguish which one is holding what properties. The BAN TACS Property Tax Return Worksheet holds only four properties to optimise the Summary pages when they are printed.
I purchased the Loan Apportionment Calculator, what if my loan is for more than 10 years?
The Loan Apportionment Calculator is built to have a life of approximately 10 years. If your loan is going to have a life longer than 10 years make a copy of the original file, preferably while blank, and use the end figures of the first file as start figures for the second file. If you struggle with copying files, follow the instructions given under How can do I copy my file so I can use a fresh copy each year?.
I missed an entry in the Loan Apportionment Calculator, how do I fix this?
You will need to shuffle your entries down one row. In the following example I will be using the Excel column letters at the top and row numbers on the far left to indicate data entry locations. Columns are indicated by letters and rows are indicated by numbers.
Let’s say you have been diligently entering your bank statement records and you are up to row 30 when you realise you missed an entry at row 15 (your fourth entry).
Note: To ‘Undo‘ any mistakes you might make while follow the steps here, use the instructions provided for our FAQ: Undoing a mistake in an MS Excel Workbook.
Using the above senario, to make room for a missed entry, what you need to do is:
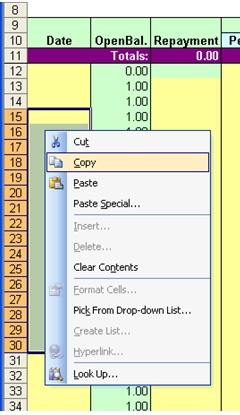
- Select your Date entries from row 15 to row 30 -> click in cell A15, continue to hold the left clicker on your mouse and pull the mouse down to cell A30
- All the relevant Date cells should now be selected so you can let go of the mouse clicker
- Now you need to COPY (do not cut) your entries -> You can either use the keyboard short-cut Ctrl+C OR use your mouse by hovering your mouse over the shaded selection (do NOT left-click) and right-click then select ‘Copy’ from the right-click menu; see the picture to the right
- Now you need to PASTE your copied cells one row down into cell A16 -> Left-click your mouse in cell A16 and, you can either use the keyboard short-cut Ctrl+V OR use your mouse by right-clicking your mouse, while inside cell A16, and select ‘Paste’ from the right-click menu.
- If you are asked about ‘over-riding exisiting information’ say Yes or Ok.
- Now we need to do the same thing for columns C to F; it’s ok we can do them all at the same time.
-> Click on cell C15, hold you left mouse click and scroll down to cell F30. - All the relevant cells in colums C, D, E and F should now be selected so you can let go of the mouse clicker
- Copy the selected cells (Ctrl+C)
- Click cell C16 and paste the copied cells (Ctrl + V)
- Don’t get excited, it’s not over yet. Now you need to go back to row 15 and enter the Date for the missing entry and other relevant figures. If your previous entry was for a different type of entry, make sure you either delete the old entry type (or you can replace it with a zero).
- Done! Good one. Try not to miss entries in the future.
How do I take my BAN TACS MS Excel Workbook to my Accountant?
You have a few choices. You can simply email the file to your accountant or you can place a copy into a memory stick (USB stick) and take it with you. Another option is to print the Worksheets; printing in black and white is more than suitable and will save your coloured ink.
How do I Transfer Information from one Property Tax Return Worksheet to a New Worksheet?
Transferring information to the new Worksheet
The easiest way to transfer the property information from the old version to the new version is to systematically move through the property tabs (Property1, Property1.Cont, Property2, Property2.Cont, etc) copying the information from the yellow cells. Only the yellow cells can be copied to; an error message will be displayed if you try to copy to other cells.
To copy more than one cell at a time
Copy cells
To copy more than one cell at a time you need to select a group of cells you want to copy, for example:
- Click inside the yellow cell I2 (Column ‘I’ Row ‘2’)
- Hover your cursor over the middle of the cell (the cursor shape should look like a largish white cross – the same as on the Red Cross flag)
- Hold your left mouse button down as you drag the mouse to cell O3 (Column ‘O’ Row ‘3’) and let you left mouse button go. you should see that all the cells you have selected now have a grey shadow over them
- Copy these cells – holding the Control button on your keyboard and the ‘C’ key at the same time (‘Ctrl’ + ‘C’)
Paste copied cells
Go to the new worksheet and paste the copied cells in, using the above example:
- Click inside the yellow cell I2 (Column ‘I’ Row ‘2’)
- Paste these cells – holding the Control button on your keyboard and the ‘V’ key at the same time (‘Ctrl’ + ‘V’)
Just keep in mind that when you ‘Paste’ you need to be in the uppermost left cell of the area you are pasting in to.
Undo a mistake
A handy feature is ‘Undo’. In Excel you can Undo by using ‘Edit’ then ‘Undo’ from the main menu. A shortcut is (‘Ctrl’+’Z’)
What if I have more questions?
Please email technicalservices@bantacs.com.au with your BAN TACS MS Excel NON-TAX questions – frequent questions will be added to this FAQ page.